
This article is intentional to the users who are novice and want to create template using bootstrap framework and Angular JS. I will create a simple SPA template step by step and will try to go through all the aspects of this article to understand clearly for the beginners. You just need some basic HTML, CSS and Javascript knowledge for everything going on fine.
After reading this post you will be able:
1. About SPA
2. How to use bootstrap using their classes and markup to create responsive design.
3. Angular JS router for multiple views and how to create custom filter.
4. Creating JSON file.
This tutorial will build SPA template for a camera store view. It is three pages template, the layout template index.html, one for list view of cameras store camera-list.html and the other for detail page of each camera camera-detail.html. Both of the partial template will be view as the part of index.html page by giving dynamic link using Angular JS routing functionality . We will create custom controller for each partial template to fetch dataset from JSON format and will show how controller binding the fetched data to the curly braces expression { { } } in the template for rendering view. We will also create the dataset in JSON format. So, this article I hope will be very useful for the beginners who want to come in Angular JS as their weapon.
What is SPA ( SIngle Page Application ) ?
Web pages loaded through browser may have rich interactive components which have many more intermediate states like page reloaded at any point in the process and control transfer to another pages (e.g. menu open, selected and clicked) but server-side rendering is hard to implement for all the intermediate states.
Single page apps are distinguished by their ability to redraw any part of the UI without requiring a server roundtrip to retrieve HTML. This is achieved by separating the data from the presentation of data by having a model layer that handles data and a view layer that reads from the models. By doing this they allow us to offer a more-native-app-like experience to the user and provide a more fluid user experience akin to a desktop application.
In an SPA, either all necessary code – HTML, JavaScript, and CSS – is retrieved with a single page load, or the appropriate resources are dynamically loaded and added to the page as necessary, usually in response to user actions. Interaction with the single page application often involves dynamic communication with the web server behind the scenes.
There are few distinct characteristics of the professional Single Page Application:
Chunking – The web page is constructed by loading chunks of HTML fragments and JSON data instead of receiving full HTML from a web server on every request.
Controllers – JavaScript code that handles complex DOM and data manipulations, application logic and AJAX calls is replaced by controllers that separate views and models using MVC or MVVM patterns.
Templating – coding of UI and DOM manipulations are replaced by declarative binding of data to HTML templates.
Routing – selection of views and navigation (without page reloads) that preserves page state, elements and data.
Real-time communication – two-way communication of a client application and web server replaces one-way requests from a browser.
Local storage – capabilities of storing data on a browser for performance and offline access replace cookies and intensive data loads from web server (HTML 5 Local storage).
To develop an SPA application there are many nice Javascript Framework like Angular, Durandal, Breeze, YUI etc. And while I love my personal favorites Angular JS, it’s not all magic. There is a learning curve and some things are helpful to decide up front. Once you choose your presentation framework to Angular, you should decide how you will organize the structure of your project.
Let's Start the Tutorial
A. Setting up the necessary files and folders:
We will go through this tutorial assuming that all of our working environment will be set in local server. So, be prepare with everything you have ready and do as the followings:
1. Create a folder inside your local server htdocs folder (e.g. in xampp -> htdocs folder). Give the name whatever you like for your project folder. I am giving this folder name simply 'spa'. Create another 3 folders name as css, js and images inside 'spa' folder. Create a file named style.css inside the 'spa' root folder. This style.css file will need for our custom css. Create another file named index.html into the 'spa' root folder which will be the gateway for multiple views loaded.
2. Download bootstrap dist compiled and minified version. As I am writing this tutorial their current version is 3.1.1. Unzip the downloaded bootstrap zip file. There you will find simply css, fonts and js folders. Copy the bootstrap.min.css file from unzipped bootstrap css folder and paste it into your 'spa' project's css folder. Copy the bootstrap.min.js file from unzipped bootstrap js folder and paste it to your 'spa' project's js folder. Copy the whole fonts folder and paste it to your 'spa' root folder. So, up to now I guessing inside your 'spa' folder the folders and files structure would look like this:
spa
- css
- bootstrap.min.css
- js
- bootstrap.min.js
- fonts
- glyphicons-halflings-regular.eot
- glyphicons-halflings-regular.svg
-glyphicons-halflings-regular.ttf
-glyphicons-halflings-regular.woff
- images
- style.css
- index.html
3. Download Angular JS by choosing build and zip option. Unzip the downloaded folder and you will see several files and folders inside angular-1.2.16 ( As I am writing this post, their latest version 1.2.16 is available for download ). We don't need them all for our project. just copy these files mentioning here: angular.min.js and angular-route.min.js to your 'spa' project under js folder. Here is again our local 'spa' project folders and files structure below:
spa
- css
- bootstrap.min.css
- js
- bootstrap.min.js
- angular.min.js
- angular-route.min.js
- fonts
- glyphicons-halflings-regular.eot
- glyphicons-halflings-regular.svg
-glyphicons-halflings-regular.ttf
-glyphicons-halflings-regular.woff
- images
- style.css
- index.html
4. set up your index.html by giving the following necessary links inside head element as below:
<link href="css/bootstrap.min.css" rel="stylesheet">
<link href="style.css" rel="stylesheet">
<script src="js/angular.min.js" ></script>
<script src="js/angular-route.min.js" ></script>
<script src="js/bootstrap.min.js"></script>
If you are interest to run and test this tutorial before further detailing you can download from the link below and set it in your local server. It's better idea to open the project in different tab in your browser and pull out all the source code in any IDE (e.g. Dreamweaver, Sublime, Eclipse etc.) besides going through this article.
| spa.rar |
B. Setting the body of index.html according bootstrap way:
Bootstrap:
Bootstrap allow us to take advantage of 12 grid columns layout for responsive purposes. So, we can leave our headache for responsiveness to bootstrap by using its nice styling class and markup element collections.
We'll build our tutorial templates using bootstrap to suit our needs.
Bootstrap grid systems are used for creating page layouts through a series of rows and columns that house your content. Here's how the Bootstrap grid system works:
In this tutorial we don't need anything necessary to do work with header and footer, So we will just keep their content as blank Let's move to the content area. Here we will declare an Angular JS directive name ng-view as an attribute within a div so that the Angular JS routing functionality can understand where to put he partial template's view as the part of index.html. Below is the markup inside body element using bootstrap predefined grid classes like "container-fluid", "container", "row" etc.
<body>
<!--Header -->
<div class="container-fluid">
<div class="row">
<div class="container">
<div class="row">
<header></header>
</div>
</div>
</div>
</div>
<!--content -->
<div class="container-fluid">
<div class="row">
<div class="container">
<div ng-view>
<div classe="col-md-3">
</div>
<div classe="col-md-3">
</div>
</div>
</div>
</div>
</div>
<!-- footer -->
<div class="container-fluid">
<div class="row">
<div class="container">
<div class="row">
<footer></footer>
</div>
</div>
</div>
</div>
</body>
By using "container-fluid" class in the parent div of header, footer and main content area each of them will take place full-width separately in the page. This is helpful for full-width background styling of each parent element. We will use also "container" class within "container-fluid" class to give the page's inner part to fixed-width centered-align when initially render the page focused on medium devices ( Desktops ≥992px ).
Though Bootstrap support 12 columns grid system, we will take 3 columns for the left sidebar using "col-md-3" class and 9 columns for content part using "col-md-9" predefined class.
Bootstrap take the headache of predefined media queries to create the key breakpoints for things getting responsive.
C. Angular JS Routing and Multiple Views :
In the content part of index.html we have declared ng-view directive in the inner div so that when to redirect multiple views using Angular JS routing functionality according page's url the ng-view attribute will work in conjunction with Angular JS $route service ( You can read my another post about Angular JS Service Details ) . The role of the ng-view directive is to include the view template for the current route into the layout template (index.html). This makes it a perfect fit for our index.html template.
Application can grow slowly and becoming more complex. In this tutorial we will provide our users with a single view (the list of all cameras when redirecting to list page and the detailed information about every camera of the list when redirecting to detail page ). We could expand the index.html file to contain template code for both views ( cameras list and camera detail ), but that would get messy very quickly. Instead we are going to turn the index.html template into what we call a "layout template". This is a template that is common for all views in our application. Other "partial templates ( cameras list and camera detail ) " are then included into this layout template depending on the current "route" - the view that is currently displayed to the user.
Application routes in Angular are declared via the $routeProvider, which is the provider of the $route service. This service makes it easy to wire together controllers, view templates, and the current URL location in the browser. Using this feature we can implement deep linking, which lets us utilize the browser's history (back and forward navigation) and bookmarks.
D. Separate the index.html as a layout template and creating other partial templates :
We will do now to separate our index layout template to camera list view and camera detail view by creating as partial layout like camera-list.html and camera-detail.html and will move the inner block of ng-view block from index.html to camera-list.html :
after remove the inner div of ng-view block of our index.html file, now it will look like this:
<!--content -->
<div >
<div >
<div >
<div ng-view>
</div>
</div>
</div>
</div>
and inside the body of camera-list.html it will be look like this :
<body>
<div classe="col-md-3"></div>
<div classe="col-md-9"></div>
</body>
See, we just moved the "col-md-3" and "col-md-9" block from index.html file to camera-list.html file to keep the layout rendering consistence ( Details of camera-list.html will be described later ).
Again, we will create another partial layout for our camera store shop name camera-detail.html. We want our customer to view a full width page for camera details, so we should take Bootstrap full width column grid by choosing "col-md-12" class for the camera-detail.html page ( Details of camera-detail.html page has described later of this article ).
<body>
<div classe="col-md-12"> </div>
</body>
Now, take a look at a glance for the whole things that are ready to go for functionality using Angular JS.
Our folders and files structure should be look like this :
spa
- css
- bootstrap.min.css
- js
- bootstrap.min.js
- angular.min.js
- angular-route.min.js
- fonts
- glyphicons-halflings-regular.eot
- glyphicons-halflings-regular.svg
-glyphicons-halflings-regular.ttf
-glyphicons-halflings-regular.woff
- images
- style.css
- index.html
- camera-list.html
- camera-detail.html
E. Constructing camera list layout :
Before going further just glance at how will look the simple camera list view. If you already downloaded the spa.rar file (Our simple camera tutorial project ) run it on your local server and open it with any of the browser.
Bootstrap:
Bootstrap allow us to take advantage of 12 grid columns layout for responsive purposes. So, we can leave our headache for responsiveness to bootstrap by using its nice styling class and markup element collections.
We'll build our tutorial templates using bootstrap to suit our needs.
Bootstrap grid systems are used for creating page layouts through a series of rows and columns that house your content. Here's how the Bootstrap grid system works:
- Rows must be placed within a .container (fixed-width) or .container-fluid (full-width) for proper alignment and padding.
- Use rows to create horizontal groups of columns.
- Content should be placed within columns, and only columns may be immediate children of rows.
- Predefined grid classes like .row and .col-xs-4 are available for quickly making grid layouts. Less mixins can also be used for more semantic layouts.
- Columns create gutters (gaps between column content) via padding. That padding is offset in rows for the first and last column via negative margin on .rows.
- Grid columns are created by specifying the number of twelve available columns you wish to span. For example, three equal columns would use three .col-xs-4.
In this tutorial we don't need anything necessary to do work with header and footer, So we will just keep their content as blank Let's move to the content area. Here we will declare an Angular JS directive name ng-view as an attribute within a div so that the Angular JS routing functionality can understand where to put he partial template's view as the part of index.html. Below is the markup inside body element using bootstrap predefined grid classes like "container-fluid", "container", "row" etc.
<body>
<!--Header -->
<div class="container-fluid">
<div class="row">
<div class="container">
<div class="row">
<header></header>
</div>
</div>
</div>
</div>
<!--content -->
<div class="container-fluid">
<div class="row">
<div class="container">
<div ng-view>
<div classe="col-md-3">
</div>
<div classe="col-md-3">
</div>
</div>
</div>
</div>
</div>
<!-- footer -->
<div class="container-fluid">
<div class="row">
<div class="container">
<div class="row">
<footer></footer>
</div>
</div>
</div>
</div>
</body>
By using "container-fluid" class in the parent div of header, footer and main content area each of them will take place full-width separately in the page. This is helpful for full-width background styling of each parent element. We will use also "container" class within "container-fluid" class to give the page's inner part to fixed-width centered-align when initially render the page focused on medium devices ( Desktops ≥992px ).
Though Bootstrap support 12 columns grid system, we will take 3 columns for the left sidebar using "col-md-3" class and 9 columns for content part using "col-md-9" predefined class.
Bootstrap take the headache of predefined media queries to create the key breakpoints for things getting responsive.
C. Angular JS Routing and Multiple Views :
In the content part of index.html we have declared ng-view directive in the inner div so that when to redirect multiple views using Angular JS routing functionality according page's url the ng-view attribute will work in conjunction with Angular JS $route service ( You can read my another post about Angular JS Service Details ) . The role of the ng-view directive is to include the view template for the current route into the layout template (index.html). This makes it a perfect fit for our index.html template.
Application can grow slowly and becoming more complex. In this tutorial we will provide our users with a single view (the list of all cameras when redirecting to list page and the detailed information about every camera of the list when redirecting to detail page ). We could expand the index.html file to contain template code for both views ( cameras list and camera detail ), but that would get messy very quickly. Instead we are going to turn the index.html template into what we call a "layout template". This is a template that is common for all views in our application. Other "partial templates ( cameras list and camera detail ) " are then included into this layout template depending on the current "route" - the view that is currently displayed to the user.
Application routes in Angular are declared via the $routeProvider, which is the provider of the $route service. This service makes it easy to wire together controllers, view templates, and the current URL location in the browser. Using this feature we can implement deep linking, which lets us utilize the browser's history (back and forward navigation) and bookmarks.
D. Separate the index.html as a layout template and creating other partial templates :
We will do now to separate our index layout template to camera list view and camera detail view by creating as partial layout like camera-list.html and camera-detail.html and will move the inner block of ng-view block from index.html to camera-list.html :
after remove the inner div of ng-view block of our index.html file, now it will look like this:
<!--content -->
<div >
<div >
<div >
<div ng-view>
</div>
</div>
</div>
</div>
and inside the body of camera-list.html it will be look like this :
<body>
<div classe="col-md-3"></div>
<div classe="col-md-9"></div>
</body>
See, we just moved the "col-md-3" and "col-md-9" block from index.html file to camera-list.html file to keep the layout rendering consistence ( Details of camera-list.html will be described later ).
Again, we will create another partial layout for our camera store shop name camera-detail.html. We want our customer to view a full width page for camera details, so we should take Bootstrap full width column grid by choosing "col-md-12" class for the camera-detail.html page ( Details of camera-detail.html page has described later of this article ).
<body>
<div classe="col-md-12"> </div>
</body>
Now, take a look at a glance for the whole things that are ready to go for functionality using Angular JS.
Our folders and files structure should be look like this :
spa
- css
- bootstrap.min.css
- js
- bootstrap.min.js
- angular.min.js
- angular-route.min.js
- fonts
- glyphicons-halflings-regular.eot
- glyphicons-halflings-regular.svg
-glyphicons-halflings-regular.ttf
-glyphicons-halflings-regular.woff
- images
- style.css
- index.html
- camera-list.html
- camera-detail.html
E. Constructing camera list layout :
Before going further just glance at how will look the simple camera list view. If you already downloaded the spa.rar file (Our simple camera tutorial project ) run it on your local server and open it with any of the browser.
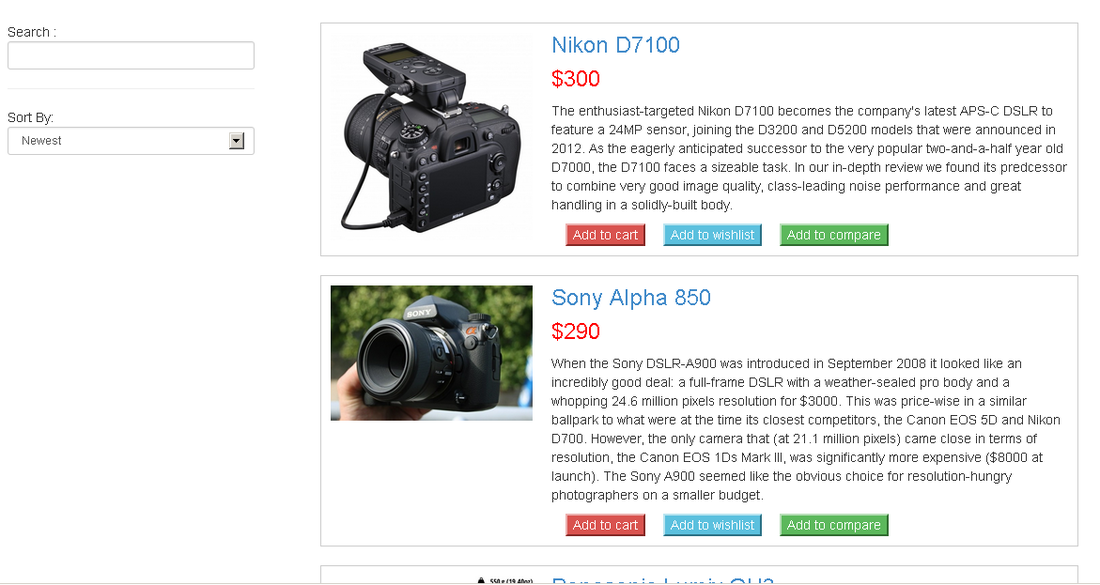
Below is the source code of camera-list.html
<body>
<div class="col-mid-3">
Search : <input list="digitalcamera" ng-model="query" class="form-control input-sm">
<datalist id="digitalcamera">
<option value="Canon EOS Rebel T3i">
<option value="Nikon D7100">
<option value="Panasonic Lumix GH3">
<option value="Sony Alpha 850">
</datalist>
<hr />
Sort By:
<select ng-model="orderby" class="form-control input-sm">
<option value="name">Alphabetically</option>
<option value="age">Newest</option>
</select>
</div>
<div class="col-mid-9">
<ul>
<li ng-repeat="camera in cameras | filter: query | orderBy: orderby" class="itemlist clearfix">
<a href="#/cameras/{{camera.id}}" class="itemthumb">
<img class="img-responsive" ng-src="{{camera.imageUrl}}" />
</a>
<div class="itemsummary">
<h3><a href="#/cameras/{{camera.id}}">{{camera.name}}</a></h3>
<h3 class="textred">{{camera.price}}</h3>
<p>
{{camera.snippet}}
</p>
<button class="btn-danger">Add to cart</button>
<button class="btn-info">Add to wishlist</button>
<button class="btn-success">Add to compare</button>
</div>
</li>
</ul>
</div>
</body>
There are two columns camera list view with the left sidebar using "col-md-3" predefined class of bootstrap grid system and the content area which taking "col-md-9" predefined class of bootstrap grid system. The left sidebar contained "search" and "Sort By" components for searching and sorting the camera list according user preference.
For search functionality the ng-model directive has been declared here with the value of "query" we will use it to filter the camera list within ng-repeat directive (for directive details you can read my post Angular JS Service Details or their nice official site angularjs.org). The camera list on the page changes depending on what a user types into the search box. We are giving style to the search box using Bootstrap predefined classes "form-control" and "input-sm" ( You can see all of the predefined classes into the bootstrap.min.css file). We are using here HTML "datalist" element for search input box because of getting Auto-Complete data (To know details there is a nice example of datalist ).
User can reorder the camera list view by choosing "Alphabetically" or "Newest product". There are two option values "name" and "age". By choosing "name" or "age" ng-model="orderby" binding dataset in conjunction with Angular JS orderBy filtering functionality. orderBy orders a specified array by the expression predicate. There are more filters in Angular JS API Reference like: currency, date, json, limitTo, lowercase, number, uppercase etc. You can see details for your interest.
Guessing you have already downloaded our spa project. So, for the time being to get an initial idea what's going on with the camera list view open the project any of you suitable IDE. Let's dig the most vital part of the camera-list.html content area. All the camera's data like images, name, price, description will be pull out from json file (coming shortly details of json ). To fetch a larger dataset from server using one of Angular's built in services called $http we will use it as Angular's dependency injection (DI) to provide the service to the custom cameraListCtrl controller which $scope is registered within custom myCameraController controller augmented to myCamera module declared in the index.html layout template as an attribute value of ng-app directive. Just take a look again in index.html where we declared our Angular JS module myCamera like <html ng-app="myCamera">.
Inside the <div class="col-md-9"> div of camera-list.html the unorder list <li ng-repeat="camera in cameras | filter: query | orderBy: orderby" class="itemlist clearfix" > where ng-repeat ="camera in cameras | filter: query | orderBy: orderby" is an Angular repeater directive. The repeater tells Angular to create a <li> element for each camera. Remember? we created in the left sidebar "search" and "sort by" options, so when user will search or select for sorting items, ng-model="query" or ng-model="orderby" take the action for filtering functionality within ng-repeat attribute like filter: query | orderBy: orderby.
Filtering, Dymanic Ordering and Two-way Data Binding :
Angular filter function process the input for the ngRepeat directive. This lets a user enter search criteria and immediately see the effects of their search on the list. This new code demonstrates the following:
As we discussed in this section about data-binding and the repeater, whenever the model changes (for example because a user changes the order with the select drop down menu), Angular's data-binding will cause the view to automatically update. No bloated DOM manipulation code is necessary!
{ { camera.name }}, {{ camera.price }}, { { camera.snippet }} all are binding similarly as the element content to view fetched data through controller. Remember, { { } } expression binding data from controller to template or template to controller that means two-way data binding where controller will binding the model data to this { { }} expression using Angular JS one of services $http which will be injected as a dependency into the controller inline notation.
Though we are creating here a template using Angular JS and Bootstrap. So, camera store shop e-commerce functionality is out of scope for our tutorial. But we have given here three buttons to keep the things looking consistency as a template. These three buttons are using also Bootstrap predefined classes ( "btn-danger", "btn-info", "btn-success" ) for styling issues. There are many button class references in the bootstrap.min.css file. You can see all of those for your interest.
User's action will be redirected to the camera detail page ( camera-detail.html ) when they click thumbnail iamge or camera name according to the following code :
<a href="#/cameras/{{camera.id}}" class="itemthumb" >
<img class="img-responsive" ng-src="{{camera.imageUrl}}" />
</a>
<a href="#/cameras/{{camera.id}}">{{camera.name}}</a>
Angular JS router will redirect user's action to this link href="#/cameras/{{camera.id}}" within config() function which will be registered within our module declared at the index.html file ( ng-app = "myCamera" ). So the config function declaration would look like myCamera.config(). Here { { camera.id } } binding is used to view the format of the link by taking camera id data from JSON dataset within related controller and the Angular JS router part will know the value of { { camera.id }} by ( : cameraId ) variable declaring like this /cameras/:cameraId into the myCamera.config( ) function.
For routing functionality and to improve the organization of the app we will create a separate js file name "app.js" and we will also create a controller.js file and later we will show the JSON dataset. You will notice that we are using a bootstrap predefined class "img-responsive" in the <img> tag. This class is styled for image responsive purposes.
F. Creating the App module :
Create a new file app.js in the js folder and include the file in the header.
Our app module will look like this.
var myCamera = angular.module('myCamera', ['ngRoute', 'myCameraController']);
myCamera.config(['$routeProvider', function($routeProvider){
$routeProvider.
when('/cameras',{
templateUrl: 'camera-list.html',
controller: 'cameraListCtrl'
}).
when('/cameras/:cameraId',{
templateUrl: 'camera-detail.html',
controller: 'cameraDetailCtrl'
}).
otherwise({
redirectTo: '/cameras'
});
}]);
We used here Angular's ngRoute module and have created a custom myCameraController module using inline notation which means that they are here as an array telling myCamera that they are registered within myCamera app and can be use later as dependency services within any controller. We can use the directives and services that they provide. Now myCamera will provide functionality for routing in conjunction with config( ) funtion. When page open, firstly camera-list.html will be rendered to view its content inside ng-view block of the index.html file fetching with the necessary data through cameraListCtrl controller with the help of $http service from JSON dataset and data will be binding to show into the {{ }} expression in the layout templates. Same will be for the camera detail page. For camera detail, cameraDetailCtrl controller will fetch the related dataset From JSON.
G. Lst's dig a deeper what is going on inside config( ) function :
Using the myCamera.config() method, we request the $routeProvider to be injected into our config function and use the $routeProvider.when() method to define our routes.
Our application routes are defined as follows:
H. Creating controller.js
We have created controller.js in the js folder and added it to the header. Following is the code of controller.js file.
var myCameraController = angular.module('myCameraController', []);
myCameraController.controller('cameraListCtrl', ['$scope', '$http', function($scope, $http){
$http.get('json/cameras.json').success(function(data){
$scope.cameras = data;
});
$scope.orderby = 'age';
}]);
myCameraController.controller('cameraDetailCtrl', ['$scope', '$routeParams', '$http',
function($scope, $routeParams, $http) {
$http.get('json/'+$routeParams.cameraId + '.json').success(function(data) {
$scope.camerasingle = data;
$scope.mainImageUrl = data.images[0];
});
$scope.setImage= function(imageUrl){
$scope.mainImageUrl = imageUrl;
}
}]);
in the app.js file myCameraController controller was created using inline notation as an array registering with angular.module myCamera that we can use it later as a dependency services to another module. So, in the controller.js file we will use it as a dependency services registering with new module myCameraController module by declaring the following line : var myCameraController = angular.module('myCameraController', []);. So, myCameraController module will now register the cameraListCtrl controller and this controller will be responsible by using it's $scope and predefined services $http as the dependency argument to fetch the large dataset from JSON file to binding the data to the camera list view.
Our JSON file path is json/cameras.json. So, We will create a JSON dataset in the different folder named Json in our 'spa' root folder. When the dataset loaded successfully it is now ready as a model data binding to view the data to the template layout file where {{ }} expression has been declared. Here $scope is responsible for two-way data binding.
Like the cameraList.ctrl cameraDetailCtrl will use $http service to fetch the JSON file of each camera details. To construct the URL for the HTTP request, we use $routeParams.cameraId extracted from the current route by the $route service.
Again, note that we created a new module called myCameraController. For small AngularJS applications, it's common to create just one module for all of your controllers if there are just a few. As your application grows it is quite common to refactor your code into additional modules. For larger apps, you will probably want to create separate modules for each major feature of your app.
Because our example app is relatively small, we'll just add all of our controllers to the myCameraController module.
I. Details of camera-detail.html
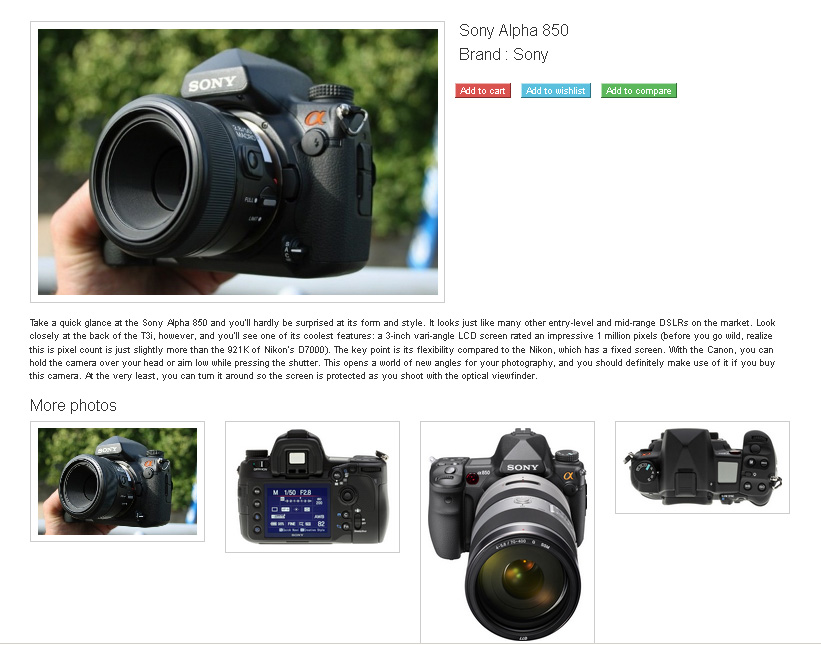
Here is our camera-detail.html page
<body>
<div class="col-mid-12">
<img ng-src="{{mainImageUrl}}" class="img-responsive itemthumbs marginbtm pull-left">
<span class="pull-left">
<h3 class="marginlft">{{camerasingle.name}}</h3>
<h3 class="marginlft">Brand : {{camerasingle.general.brand}}</h3>
<br />
<button class="btn-danger pull-left">Add to cart</button>
<button class="btn-info pull-left">Add to wishlist</button>
<button class="btn-success pull-left">Add to compare</button>
</span>
<div class="clearfix"></div>
<p class="marginbtm">{{camerasingle.description}}</p>
<h3>More photos</h3>
<div class="row">
<div class="col-md-3" ng-repeat="img in camerasingle.images">
<img ng-src="{{img}}" ng-click="setImage(img)" class="img-responsive itemthumbs">
</div>
</div>
<h3 class="margintop">Core Features</h3>
<ul class="nopadding">
<li>Resolution : {{camerasingle.sensor.resolution}}</li>
<li>Pixel : {{camerasingle.sensor.pixels}}</li>
<li>Articulated LCD : {{camerasingle.screen.articulatedlcd}}</li>
<li>Screen Size : {{camerasingle.screen.screensize}}</li>
<li>Video Format : {{camerasingle.videofeatures.Format}}</li>
<li>Manual Focus : {{camerasingle.opticsandfocus.manualfocus}}</li>
</ul>
<h3 class="margintop" >Additional Features</h3>
<ul class="nopadding">
<li>Touch Screen : {{camerasingle.screen.touchScreen | checkmark}}</li>
<li>Digital Zoom : {{camerasingle.additionalFeatures.digitalzoom | checkmark}}</li>
<li>Manual Focus : {{camerasingle.additionalFeatures.manualfocus | checkmark}}</li>
<li>Scene Modes : {{camerasingle.additionalFeatures.scenemodes | checkmark}}</li>
<li>Built in Flash : {{camerasingle.additionalFeatures.builtinflash | checkmark}}</li>
<li>Image Stabilization : {{camerasingle.additionalFeatures.imagestabilization | checkmark}}</li>
</ul>
</div>
</body>
Camera-detail.html is constructed with lists and bindings that comprise the camera details. Note where we use the Angular's {{expression}} in markup and ng-repeat to project camera data from our model into the view. The unorder list of the last parts of camera-detail page we have created custom filter "checkmark". We are going to describe custom filter next of this.
Our example camera detail page will look like below:
<body>
<div class="col-mid-3">
Search : <input list="digitalcamera" ng-model="query" class="form-control input-sm">
<datalist id="digitalcamera">
<option value="Canon EOS Rebel T3i">
<option value="Nikon D7100">
<option value="Panasonic Lumix GH3">
<option value="Sony Alpha 850">
</datalist>
<hr />
Sort By:
<select ng-model="orderby" class="form-control input-sm">
<option value="name">Alphabetically</option>
<option value="age">Newest</option>
</select>
</div>
<div class="col-mid-9">
<ul>
<li ng-repeat="camera in cameras | filter: query | orderBy: orderby" class="itemlist clearfix">
<a href="#/cameras/{{camera.id}}" class="itemthumb">
<img class="img-responsive" ng-src="{{camera.imageUrl}}" />
</a>
<div class="itemsummary">
<h3><a href="#/cameras/{{camera.id}}">{{camera.name}}</a></h3>
<h3 class="textred">{{camera.price}}</h3>
<p>
{{camera.snippet}}
</p>
<button class="btn-danger">Add to cart</button>
<button class="btn-info">Add to wishlist</button>
<button class="btn-success">Add to compare</button>
</div>
</li>
</ul>
</div>
</body>
There are two columns camera list view with the left sidebar using "col-md-3" predefined class of bootstrap grid system and the content area which taking "col-md-9" predefined class of bootstrap grid system. The left sidebar contained "search" and "Sort By" components for searching and sorting the camera list according user preference.
For search functionality the ng-model directive has been declared here with the value of "query" we will use it to filter the camera list within ng-repeat directive (for directive details you can read my post Angular JS Service Details or their nice official site angularjs.org). The camera list on the page changes depending on what a user types into the search box. We are giving style to the search box using Bootstrap predefined classes "form-control" and "input-sm" ( You can see all of the predefined classes into the bootstrap.min.css file). We are using here HTML "datalist" element for search input box because of getting Auto-Complete data (To know details there is a nice example of datalist ).
User can reorder the camera list view by choosing "Alphabetically" or "Newest product". There are two option values "name" and "age". By choosing "name" or "age" ng-model="orderby" binding dataset in conjunction with Angular JS orderBy filtering functionality. orderBy orders a specified array by the expression predicate. There are more filters in Angular JS API Reference like: currency, date, json, limitTo, lowercase, number, uppercase etc. You can see details for your interest.
Guessing you have already downloaded our spa project. So, for the time being to get an initial idea what's going on with the camera list view open the project any of you suitable IDE. Let's dig the most vital part of the camera-list.html content area. All the camera's data like images, name, price, description will be pull out from json file (coming shortly details of json ). To fetch a larger dataset from server using one of Angular's built in services called $http we will use it as Angular's dependency injection (DI) to provide the service to the custom cameraListCtrl controller which $scope is registered within custom myCameraController controller augmented to myCamera module declared in the index.html layout template as an attribute value of ng-app directive. Just take a look again in index.html where we declared our Angular JS module myCamera like <html ng-app="myCamera">.
Inside the <div class="col-md-9"> div of camera-list.html the unorder list <li ng-repeat="camera in cameras | filter: query | orderBy: orderby" class="itemlist clearfix" > where ng-repeat ="camera in cameras | filter: query | orderBy: orderby" is an Angular repeater directive. The repeater tells Angular to create a <li> element for each camera. Remember? we created in the left sidebar "search" and "sort by" options, so when user will search or select for sorting items, ng-model="query" or ng-model="orderby" take the action for filtering functionality within ng-repeat attribute like filter: query | orderBy: orderby.
Filtering, Dymanic Ordering and Two-way Data Binding :
Angular filter function process the input for the ngRepeat directive. This lets a user enter search criteria and immediately see the effects of their search on the list. This new code demonstrates the following:
- Data-binding: This is one of the core features in Angular. When the page loads, Angular binds the name of the input box to a variable of the same name in the data model and keeps the two in sync.
In this code, the data that a user types into the input box (named query) is immediately available as a filter input in the list repeater (camera in cameras| filter:query). When changes to the data model cause the repeater's input to change, the repeater efficiently updates the DOM to reflect the current state of the model.
- Use of the filter filter: The filter function uses the query value to create a new array that contains only those records that match the query.
ngRepeat automatically updates the view in response to the changing number of cameras returned by the filter filter. The process is completely transparent to the developer.
- To control the order of the items in the camera list. The dynamic ordering is implemented by creating a new model property, wiring it together with the repeater, and letting the data binding magic do the rest of the work.
- In addition to the search box, the app displays a drop down menu that allows users to control the order in which the cameras are listed.
- First, we added a <select> html element named orderby, so that our users can pick from the two provided sorting options
- We then chained the filter filter with orderBy filter to further process the input into the repeater. orderBy is a filter that takes an input array, copies it and reorders the copy which is then returned.
As we discussed in this section about data-binding and the repeater, whenever the model changes (for example because a user changes the order with the select drop down menu), Angular's data-binding will cause the view to automatically update. No bloated DOM manipulation code is necessary!
- We modified the cameras model - the array of cameras- and added an age property to each camera record. This property is used to order cameras by age.
- We added a line to the controller(see the controller.js ) that sets the default value of orderby to age ( $scope.orderby = 'age'; ) . If we had not set a default value here, the orderBy filter would remain uninitialized until our user picked an option from the drop down menu.
This is a good time to talk about two-way data-binding. Notice that when the app is loaded in the browser, "Newest" is selected in the drop down menu. This is because we set orderby to 'age' in the controller. So the binding works in the direction from our model to the UI. Now if you select "Alphabetically" in the drop down menu, the model will be updated as well and the cameras will be reordered. That is the data-binding doing its job in the opposite direction — from the UI to the model.
{ { camera.name }}, {{ camera.price }}, { { camera.snippet }} all are binding similarly as the element content to view fetched data through controller. Remember, { { } } expression binding data from controller to template or template to controller that means two-way data binding where controller will binding the model data to this { { }} expression using Angular JS one of services $http which will be injected as a dependency into the controller inline notation.
Though we are creating here a template using Angular JS and Bootstrap. So, camera store shop e-commerce functionality is out of scope for our tutorial. But we have given here three buttons to keep the things looking consistency as a template. These three buttons are using also Bootstrap predefined classes ( "btn-danger", "btn-info", "btn-success" ) for styling issues. There are many button class references in the bootstrap.min.css file. You can see all of those for your interest.
User's action will be redirected to the camera detail page ( camera-detail.html ) when they click thumbnail iamge or camera name according to the following code :
<a href="#/cameras/{{camera.id}}" class="itemthumb" >
<img class="img-responsive" ng-src="{{camera.imageUrl}}" />
</a>
<a href="#/cameras/{{camera.id}}">{{camera.name}}</a>
Angular JS router will redirect user's action to this link href="#/cameras/{{camera.id}}" within config() function which will be registered within our module declared at the index.html file ( ng-app = "myCamera" ). So the config function declaration would look like myCamera.config(). Here { { camera.id } } binding is used to view the format of the link by taking camera id data from JSON dataset within related controller and the Angular JS router part will know the value of { { camera.id }} by ( : cameraId ) variable declaring like this /cameras/:cameraId into the myCamera.config( ) function.
For routing functionality and to improve the organization of the app we will create a separate js file name "app.js" and we will also create a controller.js file and later we will show the JSON dataset. You will notice that we are using a bootstrap predefined class "img-responsive" in the <img> tag. This class is styled for image responsive purposes.
F. Creating the App module :
Create a new file app.js in the js folder and include the file in the header.
Our app module will look like this.
var myCamera = angular.module('myCamera', ['ngRoute', 'myCameraController']);
myCamera.config(['$routeProvider', function($routeProvider){
$routeProvider.
when('/cameras',{
templateUrl: 'camera-list.html',
controller: 'cameraListCtrl'
}).
when('/cameras/:cameraId',{
templateUrl: 'camera-detail.html',
controller: 'cameraDetailCtrl'
}).
otherwise({
redirectTo: '/cameras'
});
}]);
We used here Angular's ngRoute module and have created a custom myCameraController module using inline notation which means that they are here as an array telling myCamera that they are registered within myCamera app and can be use later as dependency services within any controller. We can use the directives and services that they provide. Now myCamera will provide functionality for routing in conjunction with config( ) funtion. When page open, firstly camera-list.html will be rendered to view its content inside ng-view block of the index.html file fetching with the necessary data through cameraListCtrl controller with the help of $http service from JSON dataset and data will be binding to show into the {{ }} expression in the layout templates. Same will be for the camera detail page. For camera detail, cameraDetailCtrl controller will fetch the related dataset From JSON.
G. Lst's dig a deeper what is going on inside config( ) function :
Using the myCamera.config() method, we request the $routeProvider to be injected into our config function and use the $routeProvider.when() method to define our routes.
Our application routes are defined as follows:
- when('/cameras'): The cameralist view will be shown when the URL hash fragment is /cameras. To construct this view, Angular will use the camera-list.html template and the cameraListCtrl controller.
- when('/cameras/:cameraId'): The camera details view will be shown when the URL hash fragment matches '/cameras/:cameraId', where :cameraId is a variable part of the URL. To construct the camera details view, Angular will use the camera-detail.html template and the cameraDetailCtrl controller.
- otherwise({redirectTo: '/cameras'}): triggers a redirection to /cameras when the browser address doesn't match either of our routes.
H. Creating controller.js
We have created controller.js in the js folder and added it to the header. Following is the code of controller.js file.
var myCameraController = angular.module('myCameraController', []);
myCameraController.controller('cameraListCtrl', ['$scope', '$http', function($scope, $http){
$http.get('json/cameras.json').success(function(data){
$scope.cameras = data;
});
$scope.orderby = 'age';
}]);
myCameraController.controller('cameraDetailCtrl', ['$scope', '$routeParams', '$http',
function($scope, $routeParams, $http) {
$http.get('json/'+$routeParams.cameraId + '.json').success(function(data) {
$scope.camerasingle = data;
$scope.mainImageUrl = data.images[0];
});
$scope.setImage= function(imageUrl){
$scope.mainImageUrl = imageUrl;
}
}]);
in the app.js file myCameraController controller was created using inline notation as an array registering with angular.module myCamera that we can use it later as a dependency services to another module. So, in the controller.js file we will use it as a dependency services registering with new module myCameraController module by declaring the following line : var myCameraController = angular.module('myCameraController', []);. So, myCameraController module will now register the cameraListCtrl controller and this controller will be responsible by using it's $scope and predefined services $http as the dependency argument to fetch the large dataset from JSON file to binding the data to the camera list view.
Our JSON file path is json/cameras.json. So, We will create a JSON dataset in the different folder named Json in our 'spa' root folder. When the dataset loaded successfully it is now ready as a model data binding to view the data to the template layout file where {{ }} expression has been declared. Here $scope is responsible for two-way data binding.
Like the cameraList.ctrl cameraDetailCtrl will use $http service to fetch the JSON file of each camera details. To construct the URL for the HTTP request, we use $routeParams.cameraId extracted from the current route by the $route service.
Again, note that we created a new module called myCameraController. For small AngularJS applications, it's common to create just one module for all of your controllers if there are just a few. As your application grows it is quite common to refactor your code into additional modules. For larger apps, you will probably want to create separate modules for each major feature of your app.
Because our example app is relatively small, we'll just add all of our controllers to the myCameraController module.
I. Details of camera-detail.html
Here is our camera-detail.html page
<body>
<div class="col-mid-12">
<img ng-src="{{mainImageUrl}}" class="img-responsive itemthumbs marginbtm pull-left">
<span class="pull-left">
<h3 class="marginlft">{{camerasingle.name}}</h3>
<h3 class="marginlft">Brand : {{camerasingle.general.brand}}</h3>
<br />
<button class="btn-danger pull-left">Add to cart</button>
<button class="btn-info pull-left">Add to wishlist</button>
<button class="btn-success pull-left">Add to compare</button>
</span>
<div class="clearfix"></div>
<p class="marginbtm">{{camerasingle.description}}</p>
<h3>More photos</h3>
<div class="row">
<div class="col-md-3" ng-repeat="img in camerasingle.images">
<img ng-src="{{img}}" ng-click="setImage(img)" class="img-responsive itemthumbs">
</div>
</div>
<h3 class="margintop">Core Features</h3>
<ul class="nopadding">
<li>Resolution : {{camerasingle.sensor.resolution}}</li>
<li>Pixel : {{camerasingle.sensor.pixels}}</li>
<li>Articulated LCD : {{camerasingle.screen.articulatedlcd}}</li>
<li>Screen Size : {{camerasingle.screen.screensize}}</li>
<li>Video Format : {{camerasingle.videofeatures.Format}}</li>
<li>Manual Focus : {{camerasingle.opticsandfocus.manualfocus}}</li>
</ul>
<h3 class="margintop" >Additional Features</h3>
<ul class="nopadding">
<li>Touch Screen : {{camerasingle.screen.touchScreen | checkmark}}</li>
<li>Digital Zoom : {{camerasingle.additionalFeatures.digitalzoom | checkmark}}</li>
<li>Manual Focus : {{camerasingle.additionalFeatures.manualfocus | checkmark}}</li>
<li>Scene Modes : {{camerasingle.additionalFeatures.scenemodes | checkmark}}</li>
<li>Built in Flash : {{camerasingle.additionalFeatures.builtinflash | checkmark}}</li>
<li>Image Stabilization : {{camerasingle.additionalFeatures.imagestabilization | checkmark}}</li>
</ul>
</div>
</body>
Camera-detail.html is constructed with lists and bindings that comprise the camera details. Note where we use the Angular's {{expression}} in markup and ng-repeat to project camera data from our model into the view. The unorder list of the last parts of camera-detail page we have created custom filter "checkmark". We are going to describe custom filter next of this.
Our example camera detail page will look like below:
J. Creating Custom Filter :
Camera details page will display whether certain camera features were present or not. We will use a custom filter to convert those text string into glyphs ✓ for "true", and ✘ for "false".
In order to create a new filter, we are going to create a cameraFilters module and register the custom filter with angular module in this file spa/js/filters.js (create a new file filters.js in our project js folder and include it with the head element of index.html file)
angular.module('cameraFilters', []).filter('checkmark', function(){
return function(input){
return input ? '\u2713' : '\u2718';
};
});
The name of our filter is "checkmark". The input evaluates to either true or false, and we return one of the two unicode characters we have chosen to represent true (\u2713 -> ✓) or false (\u2718 -> ✘).
Now that our filter is ready, we need to register the cameratFilters module as a dependency for our main myCamera module. We will register cameraFilters module to work with filters.js in the myCamera module as a inline notaion in the list of array. Open the app.js file and modify it like the code below.
var myCamera = angular.module('myCamera', ['ngRoute', 'myCameraController', 'cameraFilters']);
The syntax for using filters in Angular templates is as follows:
{{ expression | filter }}
and we employed it in the camera-detail.html page using unorder list tag.
<ul >
<li>Touch Screen : {{camerasingle.screen.touchScreen | checkmark}}</li>
<li>Digital Zoom : {{camerasingle.additionalFeatures.digitalzoom | checkmark}}</li>
<li>Manual Focus : {{camerasingle.additionalFeatures.manualfocus | checkmark}}</li>
<li>Scene Modes : {{camerasingle.additionalFeatures.scenemodes | checkmark}}</li>
<li>Built in Flash : {{camerasingle.additionalFeatures.builtinflash | checkmark}}</li>
<li>Image Stabilization : {{camerasingle.additionalFeatures.imagestabilization | checkmark}}</li>
</ul>
Data are viewing from the fetched dataset of each individual camera's JSON data format.
K. Event Handlers for image swapping in the camera detail page :
May be you want to add a clickable camera image swapper to the camera details page.
The camera details view displays one large image of the current camera and several smaller thumbnail images. It would be great if we could replace the large image with any of the thumbnails just by clicking on the desired thumbnail image. Let's have a look at how we have done this with Angular.
Open the controller.js file in an editor.
We will see In the cameraDetailCtrl controller that we have created the mainImageUrl model property and how we have set its default value to the first camera image URL.
myCameraController.controller('cameraDetailCtrl', ['$scope', '$routeParams', '$http',
function($scope, $routeParams, $http) {
$http.get('json/'+$routeParams.cameraId + '.json').success(function(data) {
$scope.camerasingle = data;
$scope.mainImageUrl = data.images[0];
});
$scope.setImage= function(imageUrl){
$scope.mainImageUrl = imageUrl;
}
}]);
We also created a setImage event handler function that will change the value of mainImageUrl.
Take a look at the camera-detail.html template also.
<body>
<div class="col-mid-12">
<p class="clearfix">
<img ng-src="{{mainImageUrl}}" class="img-responsive itemthumbs marginbtm pull-left">
--- --- ---
--- --- ---
<h3>More photos</h3>
<div >
<div img in camerasingle.images">
<img ng-src="{{img}}" ng-click="setImage(img)" >
</div>
</div>
--- --- ---
--- --- ---
</div>
</body>
We bound the ngSrc directive of the large image to the mainImageUrl property.
We also registered an ngClick handler with thumbnail images. When a user clicks on one of the thumbnail images, the handler will use the setImage event handler function to change the value of the mainImageUrl property to the URL of the thumbnail image.
L. Applying Animation to our example :
Here we will describe how can we enhance our camera application by attaching CSS and Javascript animations on top of the template code we created before.
The animation functionality is provided by Angular in the ngAnimate module, which is distributed separately from the core Angular framework. In addition we will use JQuery in this project to do extra JavaScript animations.
The changes required within the HTML template code is to link the asset files which define the animations as well as the angular-animate.js file. The animation module, known as ngAnimate, is defined within angular-animate.js and contains the code necessary to make your application become animation aware.
Here is what should needs to be changed for animations in our project :
a. Copy the angular-animate.js from the downloaded angular package to our spa/js project and give this link to the index.html file.
b. Download jQuery and include it to the index.html file.
c. Create a file name animations.js and include it to the index.html file
b. Create a file name animations.css and include it to the index.html file.
c. Create a new module myCameraAnimations which uses the ngAnimate module as a dependency ( just like we did before with cameraFilters ) in the spa/js/animations.js file.
var myCameraAnimations = angular.module('myCameraAnimations', ['ngAnimate']);
d. And now let's attach this module to our application module spa/js/app.js
var myCamera = angular.module('myCamera', ['ngRoute', 'myCameraController', 'cameraFilters', 'myCameraAnimations']);
Now, the myCamera module is animation aware. Let's make some animations!
We should to know the following things while using Angular JS animations :
ngView - enter and leave
ngInclude - enter and leave
ngSwitch - enter and leave
ngIf - enter and leave
ngClass or - add and remove
ngShow & ngHide - add and remove (the ng-hide class value)
We'll start off by adding CSS transition animations to our ngRepeat directive present on the camera-list.html page. First let's add an extra CSS class to our repeated element so that we can hook into it with our CSS animation code.
We have added the camera-listing CSS class? This is all we need in our HTML code to get animations working.
<li ng-repeat="camera in cameras | filter: query | orderBy: orderby" class="itemlist clearfix camera-listing">
Now for the actual CSS transition animation code :
in our spa project : spa/css/animations.css
.camera-listing.ng-enter,
.camera-listing.ng-leave,
.camera-listing.ng-move {
-webkit-transition: 0.5s linear all;
-moz-transition: 0.5s linear all;
-o-transition: 0.5s linear all;
transition: 0.5s linear all;
}
.camera-listing.ng-enter,
.camera-listing.ng-move {
opacity: 0;
height: 0;
overflow: hidden;
}
.camera-listing.ng-move.ng-move-active,
.camera-listing.ng-enter.ng-enter-active {
opacity: 1;
height: 120px;
}
.camera-listing.ng-leave {
opacity: 1;
overflow: hidden;
}
.camera-listing.ng-leave.ng-leave-active {
opacity: 0;
height: 0;
padding-top: 0;
padding-bottom: 0;
}
As you can see our camera-listing CSS class is combined together with the animation hooks that occur when items are inserted into and removed from the list:
Something important to note is that when an animation occurs, two sets of CSS classes are added to the element:
The active class name is the same as the starting class's but with an -active suffix. This two-class CSS naming convention allows the developer to craft an animation, beginning to end.
In our example above, elements expand from a height of 0 to 120 pixels when items are added or moved, around and collapsing the items before removing them from the list. There's also a nice fade-in and fade-out effect that also occurs at the same time. All of this is handled by the CSS transition declarations at the top of the example code above.
Although most modern browsers have good support for CSS transitions and CSS animations, IE9 and earlier do not. If you want animations that are backwards-compatible with older browsers, consider using JavaScript-based animations, which are described in detail below.
Next let's add an animation for transitions between route changes in ngView
To start, let's add a new CSS class to our HTML like we did in the example above. This time, instead of the ng-repeat element, let's add it to the element containing the ng-view directive. In order to do this, we'll have to make some small changes to the HTML code so that we can have more control over our animations between view changes.
In the spa/index.html file
<div class="view-container">
<div class="row view-frame" ng-view >
</div>
</div>
With this change, the ng-view directive is nested inside a parent element with a view-container CSS class. This class adds a position: relative style so that the positioning of the ng-view is relative to this parent as it animates transitions.
With this in place, let's add the CSS for this transition animation to our animations.css file:
in our spa project : spa/css/animations.css
.view-container {
position: relative;
}
.view-frame.ng-enter, .view-frame.ng-leave {
background: white;
position: absolute;
top: 0;
left: 0;
right: 0;
}
.view-frame.ng-enter {
-webkit-animation: 4s fade-in;
-moz-animation: 4s fade-in;
-o-animation: 4s fade-in;
animation: 4s fade-in;
z-index: 100;
}
.view-frame.ng-leave {
-webkit-animation: 4s fade-out;
-moz-animation: 4s fade-out;
-o-animation: 4s fade-out;
animation: 4s fade-out;
z-index:99;
}
@keyframes fade-in {
from { opacity: 0; }
to { opacity: 1; }
}
@-moz-keyframes fade-in {
from { opacity: 0; }
to { opacity: 1; }
}
@-webkit-keyframes fade-in {
from { opacity: 0; }
to { opacity: 1; }
}
@keyframes fade-out {
from { opacity: 1; }
to { opacity: 0; }
}
@-moz-keyframes fade-out {
from { opacity: 1; }
to { opacity: 0; }
}
@-webkit-keyframes fade-out {
from { opacity: 1; }
to { opacity: 0; }
}
Here! Just a simple fade in and fade out effect between pages. The only out of the ordinary thing here is that we're using absolute positioning to position the next page (identified via ng-enter) on top of the previous page (the one that has the ng-leave class) while performing a cross fade animation in between. So as the previous page is just about to be removed, it fades out while the new page fades in right on top of it.
Once the leave animation is over then element is removed and once the enter animation is complete then the ng-enter and ng-enter-active CSS classes are removed from the element rendering it to be position itself with its default CSS code (so no more absolute positioning once the animation is over). This works fluidly so that pages flow naturally between route changes without anything jumping around.
The CSS classes applied (the start and end classes) are much the same as with ng-repeat. Each time a new page is loaded the ng-view directive will create a copy of itself, download the template and append the contents. This ensures that all views are contained within a single HTML element which allows for easy animation control
Now switch to our camera-detail.html page, we see that we have a nice thumbnail swapper. By clicking on the thumbnails listed on the page, the profile camera image changes. But how can we change this around to add animations? Let's think about it first. Basically, when you click on a thumbnail image, you're changing the state of the profile image to reflect the newly selected thumbnail image. The best way to specify state changes within HTML is to use classes. Much like before, how we used a CSS class to specify an animation, this time the animation will occur whenever the CSS class itself changes.
Whenever a new camera thumbnail is selected, the state changes and the .active CSS class is added to the matching profile image and the animation plays.
Let's get started and tweak our HTML code on the camera-detail.html page first:
int he spa project lets change the camera-detail.html like the following :
<body>
<div class="col-md-12">
<div class="camera-images">
<img ng-src="{{img}}" ng-repeat="img in camerasingle.images" ng-class="{active:mainImageUrl = = img} " class="camerasingle img-responsive itemthumbs marginbtm pull-left" />
</div>
--- --- ---
--- --- ---
<div class="row">
<div class="col-md-3" ng-repeat="img in camerasingle.images">
<img ng-src="{{img}}" ng-mouseenter="setImage(img)" class="img-responsive itemthumbs" >
</div>
</div>
--- --- ---
--- --- ---
</div>
</body>
Just like with the thumbnails, we're using a repeater to display all the profile images as a list, however we're not animating any repeat-related animations. Instead, we're keeping our eye on the ng-class directive since whenever the active class is true then it will be applied to the element and will render as visible. Otherwise, the profile image is hidden. In our case, there is always one element that has the active class, and, therefore, there will always be one camera profile image visible on screen at all times.
When the active class is added to the element, the active-add and the active-add-active classes are added just before to signal AngularJS to fire off an animation. When removed, the active-remove and the active-remove-active classes are applied to the element which in turn trigger another animation.
Here is the CSS we will include into the spa/css/animations.css file
.camera-images {
background-color: white;
width: 550px;
height: 450px;
overflow: hidden;
position: relative;
float: left;
}
img.camerasingle {
float: left;
margin-right: 3em;
margin-bottom: 2em;
background-color: white;
padding: 2em;
height: 400px;
width: 500px;
display: none;
}
img.camerasingle:first-child {
display: block;
}
This time let's take the opportunity to learn how to create JavaScript-enabled animations with the animation() module method.
In our spa/js/animations.js file :
var myCameraAnimations = angular.module('myCameraAnimations', ['ngAnimate']);
myCameraAnimations.animation('.camerasingle', function() {
var animateUp = function(element, className, done) {
if(className != 'active') {
return;
}
element.css({
position: 'absolute',
top: 500,
left: 0,
display: 'block'
});
jQuery(element).animate({
top: 0
}, done);
return function(cancel) {
if(cancel) {
element.stop();
}
};
}
var animateDown = function(element, className, done) {
if(className != 'active') {
return;
}
element.css({
position: 'absolute',
left: 0,
top: 0
});
jQuery(element).animate({
top: -500
}, done);
return function(cancel) {
if(cancel) {
element.stop();
}
};
}
return {
addClass: animateUp,
removeClass: animateDown
};
});
We have used here jQuery to implement the animation. jQuery isn't required to do JavaScript animations with AngularJS, but we're going to use it because writing your own JavaScript animation library is beyond the scope of this tutorial. For more on jQuery.animate, see the jQuery documentation.
The addClass and removeClass callback functions are called whenever a class is added or removed on the element that contains the class we registered, which is in this case . camerasingle. When the .active class is added to the element (via the ng-class directive) the addClass JavaScript callback will be fired with element passed in as a parameter to that callback. The last parameter passed in is the done callback function. The purpose of done is so you can let Angular know when the JavaScript animation has ended by calling it.
The removeClass callback works the same way, but instead gets triggered when a class is removed from the element.
Within your JavaScript callback, you create the animation by manipulating the DOM. In the code above, that's what the element.css() and the element.animate() are doing. The callback positions the next element with an offset of 500 pixels and animates both the previous and the new items together by shifting each item up 500 pixels. This results in a conveyor-belt like animation. After the animate function does its business, it calls done.
Notice that addClass and removeClass each return a function. This is an optional function that's called when the animation is cancelled (when another animation takes place on the same element) as well as when the animation has completed. A boolean parameter is passed into the function which lets the developer know if the animation was cancelled or not. This function can be used to do any cleanup necessary for when the animation finishes.
M. Our sample JSON files :
Here is the JSON dataset for camera list view. It is a collection of arrays of features and can easily fetch data from it, So you can create yourself for you desiring dataset in JSON format simply and easily.
spa/json/cameras.json
[
{
"age": 0,
"id": "Nikon-d7100",
"imageUrl": "images/D7100a.jpg",
"name": "Nikon D7100",
"price": "$1697",
"snippet": "The enthusiast-targeted Nikon D7100 becomes the company's latest APS-C DSLR to feature a 24MP sensor, joining the D3200 and D5200 models that were announced in 2012. As the eagerly anticipated successor to the very popular two-and-a-half year old D7000, the D7100 faces a sizeable task. In our in-depth review we found its predcessor to combine very good image quality, class-leading noise performance and great handling in a solidly-built body."
},
{
"age": 1,
"id": "Sony-alpha-850",
"imageUrl": "images/sonyalpha850a.jpg",
"name": "Sony Alpha 850",
"price": "$950",
"snippet": "When the Sony DSLR-A900 was introduced in September 2008 it looked like an incredibly good deal: a full-frame DSLR with a weather-sealed pro body and a whopping 24.6 million pixels resolution for $3000. This was price-wise in a similar ballpark to what were at the time its closest competitors, the Canon EOS 5D and Nikon D700. However, the only camera that (at 21.1 million pixels) came close in terms of resolution, the Canon EOS 1Ds Mark III, was significantly more expensive ($8000 at launch). The Sony A900 seemed like the obvious choice for resolution-hungry photographers on a smaller budget."
},
--- --- ---
--- --- ---
]
One of the camera's details JSON file in the project folder spa/json/Canon-EOS-Rebel-T3i.json
{
"additionalFeatures": {
"digitalzoom": true,
"manualfocus" : true,
"scenemodes" : true,
"builtinflash" : true,
"imagestabilization": false
},
"general": {
"brand": "Canon",
"price": "$749",
"announced": "February 7th 2011"
},
"sensor": {
"resolution": "5184 x 3456",
"size" : "APS-C 22.3 x 14.9 mm",
"ratio" : "1:1, 4:3, 3:2, 16:9",
"sensor" : "CMOS",
"pixels" : "18 megapixels",
"photodetectors" : "19 megapixels"
},
"screen": {
"articulatedlcd": "Fully Articulated",
"screentype": "TFT color LCD, liquid-crystal monitor",
"resolution": "1,040,000 dots",
"touchScreen": false,
"screensize": "3",
"liveView": "Yes"
},
"videofeatures": {
"Resolutions": "1920 x 1080 (30, 25, 24 fps), 1280 x 720 (60, 50 fps), 640 x 480 (60, 50 fps) ",
"Format": "MPEG-4, H.264 ",
"Microphone" : "Mono",
"Speaker" : "Mono"
},
"opticsandfocus": {
"autofocus": "Contrast Detect (sensor), Phase Detect, Multi-area, Selective single-point, Single, Continuous, Face Detection, Live View",
"manualfocus": "Yes",
"Numberoffocuspoints": "9",
"lensmount": "Canon EF/EF-S"
},
"id" : "Canon-EOS-Rebel-T3i",
"name": "Canon EOS Rebel T3i",
"images": [
"images/canonrebelt3ia.jpg",
"images/canonrebelt3ib.jpg",
"images/canonrebelt3ic.jpg",
"images/canonrebelt3id.jpg"
],
"description": "Take a quick glance at the Canon EOS Rebel T3i and you’ll hardly be surprised at its form and style. It looks just like many other entry-level and mid-range DSLRs on the market. Look closely at the back of the T3i, however, and you’ll see one of its coolest features: a 3-inch vari-angle LCD screen rated an impressive 1 million pixels (before you go wild, realize this is pixel count is just slightly more than the 921K of Nikon’s D7000). The key point is its flexibility compared to the Nikon, which has a fixed screen. With the Canon, you can hold the camera over your head or aim low while pressing the shutter. This opens a world of new angles for your photography, and you should definitely make use of it if you buy this camera. At the very least, you can turn it around so the screen is protected as you shoot with the optical viewfinder."
}
That's All Folks
Thank you and Hope you will enjoy the article.
saifulmasud
01 June 2014
My next article on Magento : Magento Layout, Template, Block Details - Understanding and Creating Custom Block, Part 1
Camera details page will display whether certain camera features were present or not. We will use a custom filter to convert those text string into glyphs ✓ for "true", and ✘ for "false".
In order to create a new filter, we are going to create a cameraFilters module and register the custom filter with angular module in this file spa/js/filters.js (create a new file filters.js in our project js folder and include it with the head element of index.html file)
angular.module('cameraFilters', []).filter('checkmark', function(){
return function(input){
return input ? '\u2713' : '\u2718';
};
});
The name of our filter is "checkmark". The input evaluates to either true or false, and we return one of the two unicode characters we have chosen to represent true (\u2713 -> ✓) or false (\u2718 -> ✘).
Now that our filter is ready, we need to register the cameratFilters module as a dependency for our main myCamera module. We will register cameraFilters module to work with filters.js in the myCamera module as a inline notaion in the list of array. Open the app.js file and modify it like the code below.
var myCamera = angular.module('myCamera', ['ngRoute', 'myCameraController', 'cameraFilters']);
The syntax for using filters in Angular templates is as follows:
{{ expression | filter }}
and we employed it in the camera-detail.html page using unorder list tag.
<ul >
<li>Touch Screen : {{camerasingle.screen.touchScreen | checkmark}}</li>
<li>Digital Zoom : {{camerasingle.additionalFeatures.digitalzoom | checkmark}}</li>
<li>Manual Focus : {{camerasingle.additionalFeatures.manualfocus | checkmark}}</li>
<li>Scene Modes : {{camerasingle.additionalFeatures.scenemodes | checkmark}}</li>
<li>Built in Flash : {{camerasingle.additionalFeatures.builtinflash | checkmark}}</li>
<li>Image Stabilization : {{camerasingle.additionalFeatures.imagestabilization | checkmark}}</li>
</ul>
Data are viewing from the fetched dataset of each individual camera's JSON data format.
K. Event Handlers for image swapping in the camera detail page :
May be you want to add a clickable camera image swapper to the camera details page.
The camera details view displays one large image of the current camera and several smaller thumbnail images. It would be great if we could replace the large image with any of the thumbnails just by clicking on the desired thumbnail image. Let's have a look at how we have done this with Angular.
Open the controller.js file in an editor.
We will see In the cameraDetailCtrl controller that we have created the mainImageUrl model property and how we have set its default value to the first camera image URL.
myCameraController.controller('cameraDetailCtrl', ['$scope', '$routeParams', '$http',
function($scope, $routeParams, $http) {
$http.get('json/'+$routeParams.cameraId + '.json').success(function(data) {
$scope.camerasingle = data;
$scope.mainImageUrl = data.images[0];
});
$scope.setImage= function(imageUrl){
$scope.mainImageUrl = imageUrl;
}
}]);
We also created a setImage event handler function that will change the value of mainImageUrl.
Take a look at the camera-detail.html template also.
<body>
<div class="col-mid-12">
<p class="clearfix">
<img ng-src="{{mainImageUrl}}" class="img-responsive itemthumbs marginbtm pull-left">
--- --- ---
--- --- ---
<h3>More photos</h3>
<div >
<div img in camerasingle.images">
<img ng-src="{{img}}" ng-click="setImage(img)" >
</div>
</div>
--- --- ---
--- --- ---
</div>
</body>
We bound the ngSrc directive of the large image to the mainImageUrl property.
We also registered an ngClick handler with thumbnail images. When a user clicks on one of the thumbnail images, the handler will use the setImage event handler function to change the value of the mainImageUrl property to the URL of the thumbnail image.
L. Applying Animation to our example :
Here we will describe how can we enhance our camera application by attaching CSS and Javascript animations on top of the template code we created before.
The animation functionality is provided by Angular in the ngAnimate module, which is distributed separately from the core Angular framework. In addition we will use JQuery in this project to do extra JavaScript animations.
The changes required within the HTML template code is to link the asset files which define the animations as well as the angular-animate.js file. The animation module, known as ngAnimate, is defined within angular-animate.js and contains the code necessary to make your application become animation aware.
Here is what should needs to be changed for animations in our project :
a. Copy the angular-animate.js from the downloaded angular package to our spa/js project and give this link to the index.html file.
b. Download jQuery and include it to the index.html file.
c. Create a file name animations.js and include it to the index.html file
b. Create a file name animations.css and include it to the index.html file.
c. Create a new module myCameraAnimations which uses the ngAnimate module as a dependency ( just like we did before with cameraFilters ) in the spa/js/animations.js file.
var myCameraAnimations = angular.module('myCameraAnimations', ['ngAnimate']);
d. And now let's attach this module to our application module spa/js/app.js
var myCamera = angular.module('myCamera', ['ngRoute', 'myCameraController', 'cameraFilters', 'myCameraAnimations']);
Now, the myCamera module is animation aware. Let's make some animations!
We should to know the following things while using Angular JS animations :
- We will use ngAnimate to enable animations throughout the application
- Common ng directives automatically trigger hooks for animations to tap into.
- When an animation is found then the animation will run in between the standard DOM operation that is being issued on the element at the given time (e.g. inserting and removing nodes on ngRepeat or adding and removing classes on ngClass).
- To see animations in action, all that is required is to define the appropriate CSS classes or to register a JavaScript animation via the myModule.animation() function. The directives that support animation automatically are: ngRepeat, ngInclude, ngIf, ngSwitch, ngShow, ngHide, ngView and ngClass. Custom directives can take advantage of animation by using the $animate service.
- Below is a more detailed breakdown of the supported animation events provided by pre-existing ng directives :
ngView - enter and leave
ngInclude - enter and leave
ngSwitch - enter and leave
ngIf - enter and leave
ngClass or - add and remove
ngShow & ngHide - add and remove (the ng-hide class value)
We'll start off by adding CSS transition animations to our ngRepeat directive present on the camera-list.html page. First let's add an extra CSS class to our repeated element so that we can hook into it with our CSS animation code.
We have added the camera-listing CSS class? This is all we need in our HTML code to get animations working.
<li ng-repeat="camera in cameras | filter: query | orderBy: orderby" class="itemlist clearfix camera-listing">
Now for the actual CSS transition animation code :
in our spa project : spa/css/animations.css
.camera-listing.ng-enter,
.camera-listing.ng-leave,
.camera-listing.ng-move {
-webkit-transition: 0.5s linear all;
-moz-transition: 0.5s linear all;
-o-transition: 0.5s linear all;
transition: 0.5s linear all;
}
.camera-listing.ng-enter,
.camera-listing.ng-move {
opacity: 0;
height: 0;
overflow: hidden;
}
.camera-listing.ng-move.ng-move-active,
.camera-listing.ng-enter.ng-enter-active {
opacity: 1;
height: 120px;
}
.camera-listing.ng-leave {
opacity: 1;
overflow: hidden;
}
.camera-listing.ng-leave.ng-leave-active {
opacity: 0;
height: 0;
padding-top: 0;
padding-bottom: 0;
}
As you can see our camera-listing CSS class is combined together with the animation hooks that occur when items are inserted into and removed from the list:
- The ng-enter class is applied to the element when a new camera is added to the list and rendered on the page.
- The ng-move class is applied when items are moved around in the list.
- The ng-leave class is applied when they're removed from the list.
Something important to note is that when an animation occurs, two sets of CSS classes are added to the element:
- a "starting" class that represents the style at the beginning of the animation
- an "active" class that represents the style at the end of the animation
The active class name is the same as the starting class's but with an -active suffix. This two-class CSS naming convention allows the developer to craft an animation, beginning to end.
In our example above, elements expand from a height of 0 to 120 pixels when items are added or moved, around and collapsing the items before removing them from the list. There's also a nice fade-in and fade-out effect that also occurs at the same time. All of this is handled by the CSS transition declarations at the top of the example code above.
Although most modern browsers have good support for CSS transitions and CSS animations, IE9 and earlier do not. If you want animations that are backwards-compatible with older browsers, consider using JavaScript-based animations, which are described in detail below.
Next let's add an animation for transitions between route changes in ngView
To start, let's add a new CSS class to our HTML like we did in the example above. This time, instead of the ng-repeat element, let's add it to the element containing the ng-view directive. In order to do this, we'll have to make some small changes to the HTML code so that we can have more control over our animations between view changes.
In the spa/index.html file
<div class="view-container">
<div class="row view-frame" ng-view >
</div>
</div>
With this change, the ng-view directive is nested inside a parent element with a view-container CSS class. This class adds a position: relative style so that the positioning of the ng-view is relative to this parent as it animates transitions.
With this in place, let's add the CSS for this transition animation to our animations.css file:
in our spa project : spa/css/animations.css
.view-container {
position: relative;
}
.view-frame.ng-enter, .view-frame.ng-leave {
background: white;
position: absolute;
top: 0;
left: 0;
right: 0;
}
.view-frame.ng-enter {
-webkit-animation: 4s fade-in;
-moz-animation: 4s fade-in;
-o-animation: 4s fade-in;
animation: 4s fade-in;
z-index: 100;
}
.view-frame.ng-leave {
-webkit-animation: 4s fade-out;
-moz-animation: 4s fade-out;
-o-animation: 4s fade-out;
animation: 4s fade-out;
z-index:99;
}
@keyframes fade-in {
from { opacity: 0; }
to { opacity: 1; }
}
@-moz-keyframes fade-in {
from { opacity: 0; }
to { opacity: 1; }
}
@-webkit-keyframes fade-in {
from { opacity: 0; }
to { opacity: 1; }
}
@keyframes fade-out {
from { opacity: 1; }
to { opacity: 0; }
}
@-moz-keyframes fade-out {
from { opacity: 1; }
to { opacity: 0; }
}
@-webkit-keyframes fade-out {
from { opacity: 1; }
to { opacity: 0; }
}
Here! Just a simple fade in and fade out effect between pages. The only out of the ordinary thing here is that we're using absolute positioning to position the next page (identified via ng-enter) on top of the previous page (the one that has the ng-leave class) while performing a cross fade animation in between. So as the previous page is just about to be removed, it fades out while the new page fades in right on top of it.
Once the leave animation is over then element is removed and once the enter animation is complete then the ng-enter and ng-enter-active CSS classes are removed from the element rendering it to be position itself with its default CSS code (so no more absolute positioning once the animation is over). This works fluidly so that pages flow naturally between route changes without anything jumping around.
The CSS classes applied (the start and end classes) are much the same as with ng-repeat. Each time a new page is loaded the ng-view directive will create a copy of itself, download the template and append the contents. This ensures that all views are contained within a single HTML element which allows for easy animation control
Now switch to our camera-detail.html page, we see that we have a nice thumbnail swapper. By clicking on the thumbnails listed on the page, the profile camera image changes. But how can we change this around to add animations? Let's think about it first. Basically, when you click on a thumbnail image, you're changing the state of the profile image to reflect the newly selected thumbnail image. The best way to specify state changes within HTML is to use classes. Much like before, how we used a CSS class to specify an animation, this time the animation will occur whenever the CSS class itself changes.
Whenever a new camera thumbnail is selected, the state changes and the .active CSS class is added to the matching profile image and the animation plays.
Let's get started and tweak our HTML code on the camera-detail.html page first:
int he spa project lets change the camera-detail.html like the following :
<body>
<div class="col-md-12">
<div class="camera-images">
<img ng-src="{{img}}" ng-repeat="img in camerasingle.images" ng-class="{active:mainImageUrl = = img} " class="camerasingle img-responsive itemthumbs marginbtm pull-left" />
</div>
--- --- ---
--- --- ---
<div class="row">
<div class="col-md-3" ng-repeat="img in camerasingle.images">
<img ng-src="{{img}}" ng-mouseenter="setImage(img)" class="img-responsive itemthumbs" >
</div>
</div>
--- --- ---
--- --- ---
</div>
</body>
Just like with the thumbnails, we're using a repeater to display all the profile images as a list, however we're not animating any repeat-related animations. Instead, we're keeping our eye on the ng-class directive since whenever the active class is true then it will be applied to the element and will render as visible. Otherwise, the profile image is hidden. In our case, there is always one element that has the active class, and, therefore, there will always be one camera profile image visible on screen at all times.
When the active class is added to the element, the active-add and the active-add-active classes are added just before to signal AngularJS to fire off an animation. When removed, the active-remove and the active-remove-active classes are applied to the element which in turn trigger another animation.
Here is the CSS we will include into the spa/css/animations.css file
.camera-images {
background-color: white;
width: 550px;
height: 450px;
overflow: hidden;
position: relative;
float: left;
}
img.camerasingle {
float: left;
margin-right: 3em;
margin-bottom: 2em;
background-color: white;
padding: 2em;
height: 400px;
width: 500px;
display: none;
}
img.camerasingle:first-child {
display: block;
}
This time let's take the opportunity to learn how to create JavaScript-enabled animations with the animation() module method.
In our spa/js/animations.js file :
var myCameraAnimations = angular.module('myCameraAnimations', ['ngAnimate']);
myCameraAnimations.animation('.camerasingle', function() {
var animateUp = function(element, className, done) {
if(className != 'active') {
return;
}
element.css({
position: 'absolute',
top: 500,
left: 0,
display: 'block'
});
jQuery(element).animate({
top: 0
}, done);
return function(cancel) {
if(cancel) {
element.stop();
}
};
}
var animateDown = function(element, className, done) {
if(className != 'active') {
return;
}
element.css({
position: 'absolute',
left: 0,
top: 0
});
jQuery(element).animate({
top: -500
}, done);
return function(cancel) {
if(cancel) {
element.stop();
}
};
}
return {
addClass: animateUp,
removeClass: animateDown
};
});
We have used here jQuery to implement the animation. jQuery isn't required to do JavaScript animations with AngularJS, but we're going to use it because writing your own JavaScript animation library is beyond the scope of this tutorial. For more on jQuery.animate, see the jQuery documentation.
The addClass and removeClass callback functions are called whenever a class is added or removed on the element that contains the class we registered, which is in this case . camerasingle. When the .active class is added to the element (via the ng-class directive) the addClass JavaScript callback will be fired with element passed in as a parameter to that callback. The last parameter passed in is the done callback function. The purpose of done is so you can let Angular know when the JavaScript animation has ended by calling it.
The removeClass callback works the same way, but instead gets triggered when a class is removed from the element.
Within your JavaScript callback, you create the animation by manipulating the DOM. In the code above, that's what the element.css() and the element.animate() are doing. The callback positions the next element with an offset of 500 pixels and animates both the previous and the new items together by shifting each item up 500 pixels. This results in a conveyor-belt like animation. After the animate function does its business, it calls done.
Notice that addClass and removeClass each return a function. This is an optional function that's called when the animation is cancelled (when another animation takes place on the same element) as well as when the animation has completed. A boolean parameter is passed into the function which lets the developer know if the animation was cancelled or not. This function can be used to do any cleanup necessary for when the animation finishes.
M. Our sample JSON files :
Here is the JSON dataset for camera list view. It is a collection of arrays of features and can easily fetch data from it, So you can create yourself for you desiring dataset in JSON format simply and easily.
spa/json/cameras.json
[
{
"age": 0,
"id": "Nikon-d7100",
"imageUrl": "images/D7100a.jpg",
"name": "Nikon D7100",
"price": "$1697",
"snippet": "The enthusiast-targeted Nikon D7100 becomes the company's latest APS-C DSLR to feature a 24MP sensor, joining the D3200 and D5200 models that were announced in 2012. As the eagerly anticipated successor to the very popular two-and-a-half year old D7000, the D7100 faces a sizeable task. In our in-depth review we found its predcessor to combine very good image quality, class-leading noise performance and great handling in a solidly-built body."
},
{
"age": 1,
"id": "Sony-alpha-850",
"imageUrl": "images/sonyalpha850a.jpg",
"name": "Sony Alpha 850",
"price": "$950",
"snippet": "When the Sony DSLR-A900 was introduced in September 2008 it looked like an incredibly good deal: a full-frame DSLR with a weather-sealed pro body and a whopping 24.6 million pixels resolution for $3000. This was price-wise in a similar ballpark to what were at the time its closest competitors, the Canon EOS 5D and Nikon D700. However, the only camera that (at 21.1 million pixels) came close in terms of resolution, the Canon EOS 1Ds Mark III, was significantly more expensive ($8000 at launch). The Sony A900 seemed like the obvious choice for resolution-hungry photographers on a smaller budget."
},
--- --- ---
--- --- ---
]
One of the camera's details JSON file in the project folder spa/json/Canon-EOS-Rebel-T3i.json
{
"additionalFeatures": {
"digitalzoom": true,
"manualfocus" : true,
"scenemodes" : true,
"builtinflash" : true,
"imagestabilization": false
},
"general": {
"brand": "Canon",
"price": "$749",
"announced": "February 7th 2011"
},
"sensor": {
"resolution": "5184 x 3456",
"size" : "APS-C 22.3 x 14.9 mm",
"ratio" : "1:1, 4:3, 3:2, 16:9",
"sensor" : "CMOS",
"pixels" : "18 megapixels",
"photodetectors" : "19 megapixels"
},
"screen": {
"articulatedlcd": "Fully Articulated",
"screentype": "TFT color LCD, liquid-crystal monitor",
"resolution": "1,040,000 dots",
"touchScreen": false,
"screensize": "3",
"liveView": "Yes"
},
"videofeatures": {
"Resolutions": "1920 x 1080 (30, 25, 24 fps), 1280 x 720 (60, 50 fps), 640 x 480 (60, 50 fps) ",
"Format": "MPEG-4, H.264 ",
"Microphone" : "Mono",
"Speaker" : "Mono"
},
"opticsandfocus": {
"autofocus": "Contrast Detect (sensor), Phase Detect, Multi-area, Selective single-point, Single, Continuous, Face Detection, Live View",
"manualfocus": "Yes",
"Numberoffocuspoints": "9",
"lensmount": "Canon EF/EF-S"
},
"id" : "Canon-EOS-Rebel-T3i",
"name": "Canon EOS Rebel T3i",
"images": [
"images/canonrebelt3ia.jpg",
"images/canonrebelt3ib.jpg",
"images/canonrebelt3ic.jpg",
"images/canonrebelt3id.jpg"
],
"description": "Take a quick glance at the Canon EOS Rebel T3i and you’ll hardly be surprised at its form and style. It looks just like many other entry-level and mid-range DSLRs on the market. Look closely at the back of the T3i, however, and you’ll see one of its coolest features: a 3-inch vari-angle LCD screen rated an impressive 1 million pixels (before you go wild, realize this is pixel count is just slightly more than the 921K of Nikon’s D7000). The key point is its flexibility compared to the Nikon, which has a fixed screen. With the Canon, you can hold the camera over your head or aim low while pressing the shutter. This opens a world of new angles for your photography, and you should definitely make use of it if you buy this camera. At the very least, you can turn it around so the screen is protected as you shoot with the optical viewfinder."
}
That's All Folks
Thank you and Hope you will enjoy the article.
saifulmasud
01 June 2014
My next article on Magento : Magento Layout, Template, Block Details - Understanding and Creating Custom Block, Part 1
